Background
Docker is a powerful containerization platform that has revolutionized the way software applications are developed, deployed, and managed. It enables developers to package applications and their dependencies into lightweight, portable containers, providing a consistent and isolated environment across different computing environments, such as development laptops, data centers, and cloud infrastructure. Docker has gained widespread popularity in the world of DevOps and container orchestration due to its ease of use, scalability, and the ability to streamline the application deployment process. It has become an essential tool for modern software development, facilitating faster development cycles and simplifying the deployment of complex applications.
What we will learn
- Dockerize Node JS app with Mongo DB
- Dockerize React JS app
- Enable hot reloading for Node and React app in development
- Combine both apps to run from a single command i.e. docker compose
- Troubleshoot containers
*Note: This is a tutorial for intermediate developers who want to combine multiple applications with docker compose. If you are a complete beginner, I encourage you to learn the basics first and then follow the article.
Best Resource to Learn: Docker Docs
Folder Structure
Prior to delving into the coding process, let's take a look at the folder structure of our microservices-based applications.
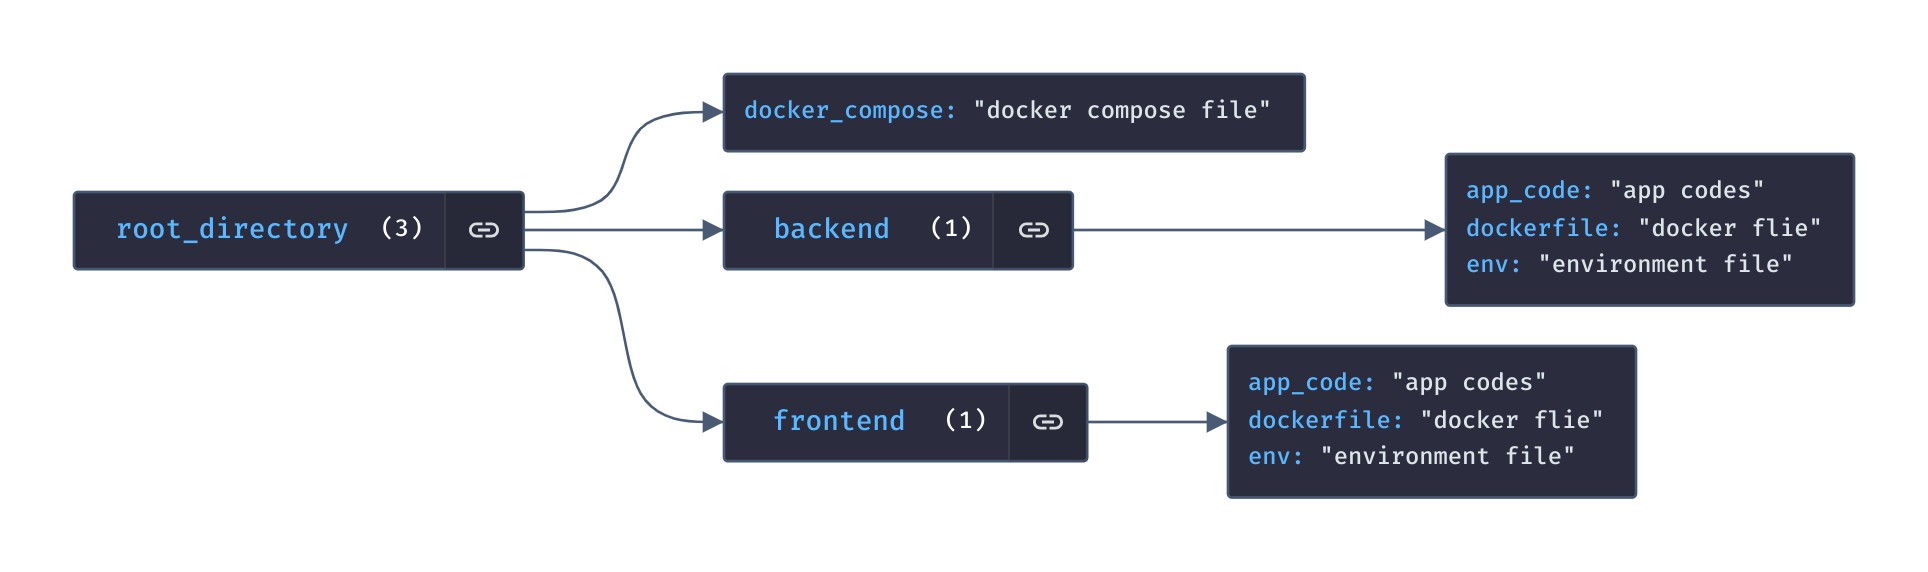
Alright! Now we have an overview of the application structure, let's start dockerizing our apps step by step and combine them with docker compose at the end.
Make sure your projects are aligned as shown in the Folder Structure section.
Dockerize Node JS App
Before we dockerize the Node app, make sure mongo DB is connected. Here is the sample .env file for our backend. Add `.env` file inside `backend` and add DB variable.
MONGODB_URI=mongodb://mongo_database:27017/test_db
Notice, we are using mongo_database instead of localhost which is basically a database service we are going to run from our docker compose file later.
Now, add a `Dockerfile.nodeBackend` file inside the `backend` directory and paste the following code.
FROM node:18-alpine as base
WORKDIR /app
COPY ./package.json ./package.json
COPY . .
RUN yarn install
EXPOSE 4000
FROM base as production
ENV NODE_ENV=production
RUN yarn install --production
CMD ["yarn", "start"]
FROM base as dev
ENV NODE_ENV=development
RUN yarn global add nodemon
RUN yarn install
CMD ["yarn", "dev"]
Dockerize React JS App
Also, React apps connect with backend using backend API endpoint so feel free to add .env file inside frontend i.e. your react app and add environment variable.
REACT_APP_API_SERVER=http://localhost:4000
To dockerize React apps, add a Dockerfile.reactUI and paste the following code.
FROM node:18-alpine
WORKDIR /app
COPY ./package.json ./package.json
COPY . .
RUN yarn install
EXPOSE 3000
So far, we have created Dockerfile for our frontend and backend and to create docker image out of this file and spinning containers, we need docker-compose.
Docker Compose
Docker Compose is a powerful tool for defining and running multi-container Docker applications. It simplifies the management of complex applications that consist of multiple interconnected services by allowing you to define their configuration in a single file, typically named docker-compose.yml. With Docker Compose, you can specify the services, networks, volumes, and other settings required for your application, making it easy to reproduce and deploy your entire application stack with a single command.
If you have made it so far, we are gonna write a magical compose file that will spin our docker containers with a single command and our apps will be up and running!
Let's create a docker-compose.yml file inside the root directory. Make sure it is in the same level with backend and frontend code bases.
After creating a file, just paste the following code
version: "3"
services:
  myfrontend:
    volumes:
      - ./frontend:/app #Important for hot loading
      - /app/node_modules
    env_file:
      - ./frontend/.env
    environment:
      - WATCHPACK_POLLING = true #Important for hot loading
    command: ["yarn", "start"]
    build:
      context: ./frontend # Location for Dockerfile
      dockerfile: Dockerfile.reactUI
    ports:
      - "3000:3000"
    depends_on:
      - db
  mybackend:
    volumes:
      - ./backend:/app #Important for hot loading
      - /app/node_modules
    env_file:
      - ./backend/.env
    environment:
      - WATCHPACK_POLLING = true
      - NODE_ENV=development
    command: ["npm", "run", "dev"]
    build:
      context: ./backend # Location for Dockerfile
      target: dev
      dockerfile: Dockerfile.nodeBackend
    ports:
      - "4000:4000"
    depends_on:
      - db
  db:
    container_name: mongo_database # Notice the container name used
    volumes:
      - myMongodb:/data/db  # Persist data inside container
    image: mongo:latest # Pulling from docker hub
    ports:
      - "127.0.0.1:27018:27017" # Database port mapping
volumes:
  myMongodb:
All set now, just go into the terminal and be inside the root directory then run the following command to run projects.
The command will build docker images and run as containers in detached mode.
docker compose up -d --build
Now check your browser, Frontend should be running at http://localhost:3000 and Backend should be running at http://localhost:4000
Also, a single command will shutdown all of our apps and mongo DB service. You just need to run:
docker compose down
Troubleshoot
While developing our applications things can go wrong and we need to check logs and activities of our application in order to resolve it. We can see running containers using the command docker ps and it will display the list of all containers that are running.
Now to check logs, run: docker logs CONTAINER_ID and it will display the logs of our application.
*Note: CONTAINER_ID is a long set of characters so feel free to use only the first three characters for ease.
Summary
This is a base for combining multiple services from single file and start/stop using single command along with hot reloading. We can scale it as much as we want. We can keep adding services that we need like Redis, Next JS just by adding Dockerfile for each service and building and spinning it from docker compose.
I hope the tutorial was helpful enough. Thanks for being here. Keep learning, Keep sharing!
Binod Chaudhary

Software Engineer | Full-Stack Developer